Prepare
Since we will have REST API we are gonna use cookiecutter-django-rest. Repository and you will find that for creating django-project you have to run two commands:
# install cookicutter
$ pip3 install cookiecutter
# run cookicutter-django-rest
$ cookiecutter gh:agconti/cookiecutter-django-rest
Answer the prompts with your own desired options. Here is my example:Then cookiecutter will generate project (new directory with project name)
Database
We will use postgresql as database and the first thing you have to do is install it.
$ sudo apt-get update
$ sudo apt-get install postgresql postgresql-contrib
Since you have instllaed it then create database and role.
# login as a super user postgres
$ sudo su - postgres
# enter psql promtp
$ psql

postgres=# create database gitgile;
CREATE DATABASE

postgres=# create role gitgile with password 'gitgile';
CREATE ROLE

postgres=# grant all privileges on database gitgile to gitgile;
GRANT

# Enable your user to login
postgres=# ALTER ROLE "gitgile" WITH LOGIN;

# exit psql promt
postgres=# \q

# logout
postgres@an4ik-laptop:~$ exit
It's recommend to have the same name for database, role, password. It's not a vulnerability since it's local deployment.
Virtual environment
You have already known about virtual environment (you had to use it in django tutorials). There is convention about naming virtual environment .venv or venv (observation from virtual environment). So let's create virtual environment.
$ python3 -m virtualenv .venv

Then activate it and install required libraries
# activate your virtual environment
$ source .venv/bin/activate
# after activating virtual environment you can see it in the left side, shell starts with (.venv)

# install required libraries to your virtual environment
$ pip3 install -r requirements.txt

Configuration
We have created database named 'gitgile', role 'gitgile' with password 'gitgile', so let's set them in project configuration. Look at the file gitGile/config/common.py. You have to change it.

Our used boilerplate cookicutter-django-rest created the project without SECRET_KEY, so do it now. Here is my example

Migration
What is a migration? Read the django documentation and after that do migration
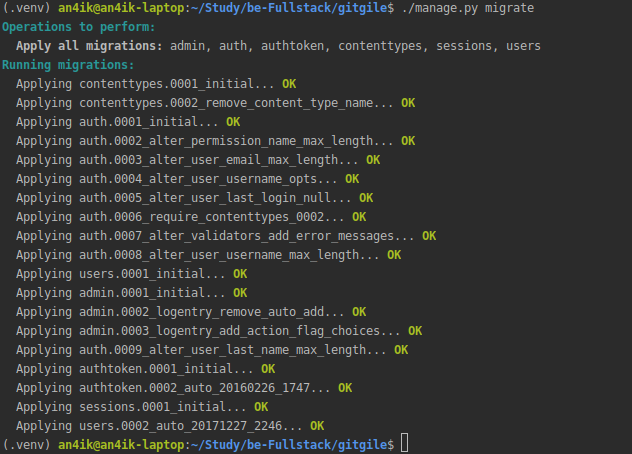
Again, it's appylied all models changes to our database. Now we have all required schemas, tables etc.
Run application
# Run our application locally
$ ./manage.py runserver
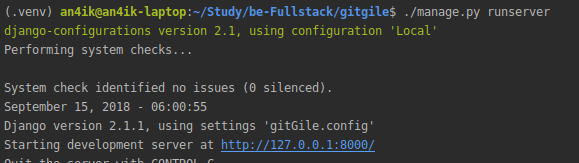
Now you can see it via your browser using localhost:8000.
Initial commit and pushing to the repository
It's time to create repository in your github account, do initial commit and push it.
- Create github repository
- Commit and push your local changes
This is my initial commit
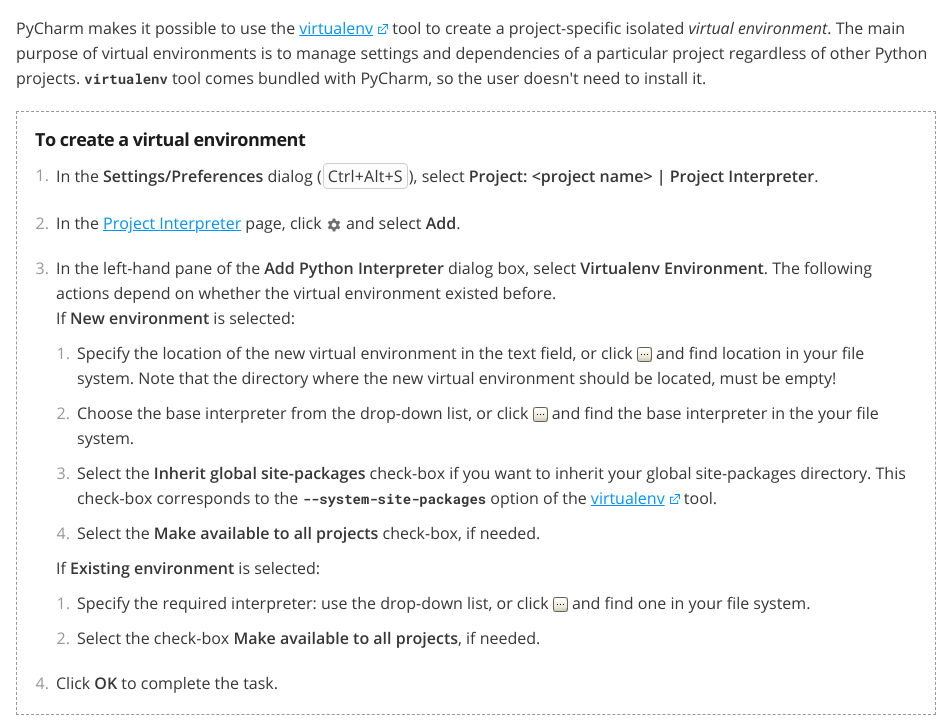
Configuring Virtualenv Environment in PyCharm
Set virtual environment to your IDEA. Follow instructions from JetBrains documentation.